Server Build Part 2 - Operating System and Storage
2020-03-24
(Last Updated
2022-09-08)
— Written by Lachlan— 9 min read
The server hardware is racked and cabled. It’s time to choose an operating system. Linux was an obvious choice, but which distribution? With a little research, I narrowed the choices down to Unraid and Proxmox VE.
Unraid has a reasonable cost ($60 for up to 6 attached devices) and has support for running Virtual Machines and Docker containers. However, it is a NAS with additional features rather than these being the primary features. I already have a NAS, QNAP TS-451+, which also runs VMs and Docker Containers, but it’s not powerful enough to run everything I want. This new server is destined to be primarily a compute server with access to some internal and external storage from NAS.
Proxmox VE has a subscription support model based on the number of CPU sockets ranging from € 85 (~ $91 USD) per year per socket for community support up to to € 796 (~ $856 USD) per year per socket for premium support. It has all features enabled without a subscription, but you do get a reminder that you don’t have a subscription in the administrative user interface. Subscriptions also grant access to the Enterprise package repository and you will need to use the No-Subscription repository if you don’t have one.
Another plus for Proxmox VE is that it is based on Debian and can be installed directly on top of an existing Debian 10 (Buster) installation. However, the recommended installation method is using the Bare Metal installer. The only problem I ran into was that that the default BIOS settings didn’t have AMD-V enabled. There was no error message, the installer would just never finish loading. It wasn’t until I decided to try the Unraid trial that I got an error message about virtualization not being enabled that it dawned on me why the installer failed.
I also didn’t take the time to customize the layout of the internal disk so Proxmox took the entire thing and configured it with LVM. I would have preferred ZFS so I could use the internal disk as cache for the external storage, but root zpools require special configuration and I managed to make the cache work anyway.
Fortunately, Proxmox VE offers comprehensive documentation covering both the command-line (CLI) and web-based user interface (GUI). Command line means it can be configured and managed with Ansible.
The choice of available storage types you choose depends on the features you need and capabilities of your available storage. I may add more physical hosts to the mix in the future so I wanted to make sure I could grow into a Proxmox Cluster. I needed storage options which could be shared across multiple nodes. I also wanted to have support for snapshots for backups.
From a Proxmox perspective, it can utilize either file-based or block-based storage. Once visible to the physical host, the storage is configured within Proxmox to contain one or more types of content: isos, templates, backups, images, rootdir, or snippets. This is configured through the pvesm (Proxmox VE storage manager) command, editing /etc/pve/storage.cfg directly, or through the administration interface.
Here is an exerpt from storage.cfg after installation:
dir: local
	path /var/lib/vz
	content backup,iso,vztmpl

lvmthin: local-lvm
	thinpool data
	vgname pve
	content rootdir,images
“local” is just a local directory on the physical host. It’s not shared with any other hosts in the cluster.
“local-lvm” is a volume on the localhost which is thin provisioned meaning that storage is consumed only as it’s needed and not pre-allocated.
Using the various LVM commands, we can see there there is one physical device and one volume group containing that physical device:
This is going to be high performance storage because it’s m.2 NVMe, but it’s not redudnant so anything stored there will be lost if the disk fails. Within that volume group, there are a number of logcial volumes representing all logical disks available for use within the system:
# lvs
  LV                VG  Attr       LSize    Pool Origin           Data%  Meta%  Move Log Cpy%Sync Convert
  data              pve twi-aotz-- <794.79g                       3.38   0.40
  root              pve -wi-ao----   96.00g
  swap              pve -wi-ao----    8.00g
  vm-100-disk-0     pve Vwi-aotz--    8.00g data                  14.32
  vm-101-disk-0     pve Vwi-a-tz--   10.00g data                  9.40
  .
  .
  .
  zcache            pve -wi-ao----   10.00g
  zlog              pve -wi-ao----    5.00g

These logical volumes, including the vm-disk volumes, can take advantage of all of the LVM features such as snapshots. Take note of the zcache and zlog volumes, I will explain those later.

On the QNAP, I have a folder, available by NFS, which contains the iso images that can be mounted within virtual machines as a CD-ROM device. To make it available for Proxmox to use, I added it like this:
nfs: qnap-iso
export /iso
path /mnt/pve/qnap-iso
server 192.168.xx.xx
content iso
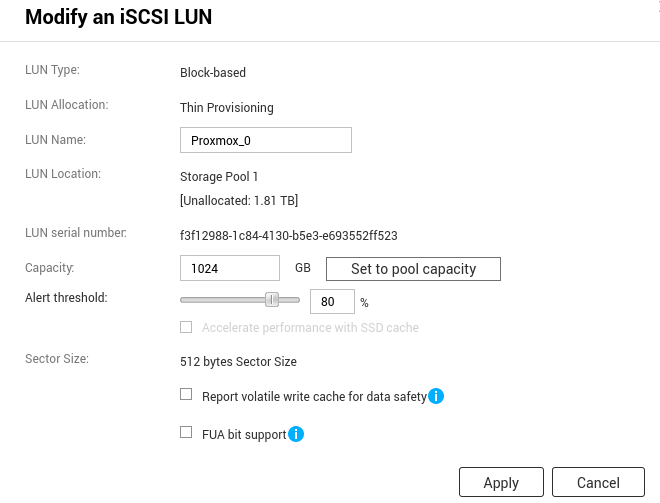
The last piece is to configure is a large pool of storage from the QNAP which will be used for any critical data because it's on two physical disks which are mirrored. First, I will create an iSCSI LUN on QNAP which is thinly provisioned from the primary storage pool of mirrored disks:


Next, I need to install the open-iscsi to gain access to the iscsiadm command:
The client in iSCSI (or SCSI over TCP/IP) is called the initiator, the server is the portal, and LUN is the target. The initiator name is set in /etc/iscsi/initiatorname.iscsi. While you can use username/password (CHAP) authentication, I had trouble getting  it to work reliably with multipath so within my private LAN I'm relying only on the client presenting the correct initiator name for access control.

The first thing is to query the iSCSI server and find out about what targets are available:
iscsiadm -m discovery -t st -p 192.168.xx.xx
If you will be utilizing CHAP or configuring other options, you go to /etc/iscsi/nodes/<targetname>/<portal>/default and edit as needed. Once everything is working, change the node.startup option from manual to automatic so it's available after reboots.

Next, I need open a session to the target and portal I want:
If successful, a new block device will show up using the lsblk command. For me, it was /dev/sda and /dev/sdb because the QNAP has two network interfaces with their own IP addresses:
NAME MAJ:MIN RM SIZE RO TYPE MOUNTPOINT
sda 8:0 0 1T 0 disk
sdb 8:16 0 1T 0 disk
Next I need to configure multipath by editing /etc/multipath.conf:
Before we edit multipath.conf, we need the unique id of our target to it so we can block all devices from multipath control except the devices we want:
NAME                            MAJ:MIN RM   SIZE RO TYPE  MOUNTPOINT
sda                               8:0    0     1T  0 disk
└─iproxmox                      253:6    0     1T  0 mpath
sdb                               8:16   0     1T  0 disk
└─iproxmox                      253:6    0     1T  0 mpath
Now we can treat this device (/dev/mapper/iproxmox) like any other block device. We can partition, create filesystems, and mount them.
However, I created a zfs pool with it:
# zpool create proxmoxqnap iproxmox

ZFS is both a filesystem and a logical volume manager. You can create logical volumes, mount them, even add additional devices to create mirrors and RAID configurations. That's already done (mirrored) by QNAP so I don't need to do anything else but add the pool to Proxmox:
zfspool: qnap-zfs
pool proxmoxqnap
content images,rootdir
mountpoint /proxmoxqnap
I mentioned, though, that I wanted to add the local disk to act as a cache for the QNAP storage. Remember, the zcache and zlog volumes on LVM?
ZFS has two different kinds of cache devices. Writes are cached by allowing them to be written to a ZFS Intent Log (zlog) device. The write will succeed immediately, but will be written to the pool devices later. If the log device fails, the data is lost so the log device could be mirrored if needed. Read caches are handled by a cache device.